Somewhere between slicing and the final layer, something goes wrong. You open the printer lid and find a spaghetti pile, a warped base, or a print that looks like it melted halfway through. The frustrating part is not the failed print itself. It is not knowing exactly why it failed. Manual 3D print failure diagnosis is genuinely hard: stringing looks like underextrusion at a glance, layer delamination mimics adhesion failure, and ghost lines from resonance get misread as over-extrusion. AI-powered photo diagnosis changes the entire troubleshooting equation by reading the physical evidence in your print and returning a specific, actionable answer in seconds.
Table of Contents
- Quick Takeaways
- Why Manual Diagnosis Keeps Letting You Down
- How Vision AI Actually Reads a Failed Print
- The Most Misdiagnosed Print Defects and What AI Catches
- Stringing vs Layer Delamination: A Case Study in AI Accuracy
- Comparison of 3D Print Failure Diagnosis Approaches
- What Good AI Photo Diagnosis Output Actually Looks Like
- How to Photograph a Failed Print for Accurate AI Analysis
- Frequently Asked Questions
- References
Quick Takeaways
|
Key Insight |
Explanation |
|---|---|
|
Visual defects carry diagnostic fingerprints |
Each failure mode, stringing, warping, delamination, or ghosting, leaves a physically distinct pattern that vision AI is trained to distinguish from one another. |
|
Human misdiagnosis is extremely common |
A 2023 survey of FDM hobbyist forums found that over 60% of troubleshooting threads initially blamed the wrong variable, most often confusing temperature-related defects with speed-related ones. |
|
AI diagnosis skips the trial-and-error cycle |
Traditional troubleshooting can cost 5 to 15 failed test prints before landing on the right fix. Photo-based AI diagnosis shortens that to a single upload and a settings recommendation. |
|
Stringing and underextrusion look similar but need opposite fixes |
Stringing often requires lower temperatures or faster travel speed. Underextrusion may need higher temperatures or more flow rate. Applying the wrong fix makes both worse. |
|
Photo quality directly affects diagnosis accuracy |
A blurry or poorly lit image returns vague results. Sharp, well-lit, close-up photos from multiple angles let AI identify defect geometry with high confidence. |
|
Slicer-specific recommendations matter |
A diagnosis that says “increase retraction” is incomplete. A useful AI tool maps its recommendation directly to named settings in PrusaSlicer or OrcaSlicer so you can act immediately. |
|
Pattern matching improves with community data |
AI models trained on curated real-world failure cases perform significantly better than those trained only on synthetic or CAD-based imagery, because real prints fail in messy, non-ideal ways. |
Why Manual Diagnosis Keeps Letting You Down
Most 3D printing enthusiasts approach a failed print the same way: they post a photo in a forum, wait for replies, and get five different opinions pointing in five different directions. One person says raise the temperature, another says lower it. Someone else suggests re-leveling the bed. The root cause is rarely identified cleanly because visual diagnosis without a structured model is inherently inconsistent.
The problem compounds quickly. Once you apply a wrong fix, the next print carries a mixture of the original defect and the side effects of your incorrect adjustment. You are now troubleshooting two problems instead of one. In practice, this cycle eats filament, time, and patience faster than any other part of the 3D printing workflow.
Even experienced operators make diagnosis errors because many defect signatures overlap. Layer delamination and poor bed adhesion both show separation, but one is a temperature problem and the other is a surface preparation problem. Ghosting and over-extrusion both produce surface artifacts, but they require completely different parameter changes. The human eye without systematic training simply cannot reliably separate these patterns.

Pro tip: Before touching any slicer setting after a failed print, take three photos from different angles under consistent lighting. This gives you, or any AI tool, the raw evidence needed for an accurate 3D print failure diagnosis rather than a guess.
How Vision AI Actually Reads a Failed Print
Vision AI applied to 3D print failure diagnosis works by running your photograph through a model trained to recognize spatial patterns associated with specific defect classes. It is not reading a description of your problem. It is reading the physical geometry of the failure itself: thread thickness, layer separation width, surface regularity, bead shape, and spatial distribution of anomalies across the print.
The distinction matters. When you describe your problem in text, you introduce interpretation error. You might call something “rough” when it is technically exhibiting ringing artifacts. You might say layers are “not sticking” when the real issue is moisture-compromised filament causing poor inter-layer bonding rather than adhesion failure. Vision AI bypasses your interpretation and reads the evidence directly.
What the Model Is Actually Detecting
A well-trained vision model for 3D print photo diagnosis looks for several measurable features simultaneously. It examines surface texture continuity, thread geometry at travel endpoints, the angle and spacing of layer lines, the regularity of perimeter widths, and the presence of blob or zit artifacts at specific z-heights. Each defect class has a fingerprint that appears consistently across material types and printer platforms.
The model then cross-references the detected pattern against a knowledge base of real-world test cases. At Ask The Nozzle, that knowledge base is built from curated community expertise and documented test prints, not synthetic data, which means the model has seen how PETG actually strings versus how PLA strings, and how each looks different under normal room lighting in a smartphone photo.
Pro tip: When uploading a photo to an AI diagnosis tool, include one shot of the full print for context and one close-up of the specific defect area. The combination gives the model both macro geometry and fine surface detail, which significantly improves classification accuracy.
The Most Misdiagnosed Print Defects and What AI Catches
Certain failure modes appear far more often in misdiagnosed troubleshooting threads than others. Understanding which defects are most commonly confused helps explain why a systematic, vision-based approach to AI 3D printing troubleshooting outperforms community forum advice.
Ringing Mistaken for Over-Extrusion
Ringing, also called ghosting or resonance artifacts, appears as a wave pattern radiating outward from sharp corners or edges. It is caused by mechanical vibration in the printer frame or motion system, and the fix is reducing print speed or increasing frame rigidity. Over-extrusion produces a different surface artifact, a consistent raised or bulging quality across surfaces rather than a localized wave pattern. A common mistake is raising retraction or reducing flow when the actual problem is resonance, which does nothing to address the mechanical root cause and often introduces underextrusion as a secondary problem.
Moisture Damage Mistaken for Temperature Issues
Wet filament produces popping sounds during printing and a visibly rough, bubbly, or stringy surface. The data consistently shows that moisture-damaged PETG and Nylon are the most frequently misdiagnosed materials, with users raising nozzle temperature repeatedly when the actual fix is filament drying. Vision AI trained on real-world cases can often detect the characteristic bubble texture and micro-void pattern of moisture-damaged prints, which looks distinctly different from the smooth, thin threads of normal stringing.
Partial Clog Mistaken for Z-Offset Error
A partial clog produces inconsistent extrusion that varies by layer, creating bands of under-extruded material at irregular intervals. Z-offset errors produce a consistent and predictable effect: either the first layer is too flat and wide, or it has visible gaps between lines. A vision AI model distinguishes these by the distribution pattern. Z-offset issues are geometrically regular. Clog-related underextrusion is random and height-independent.
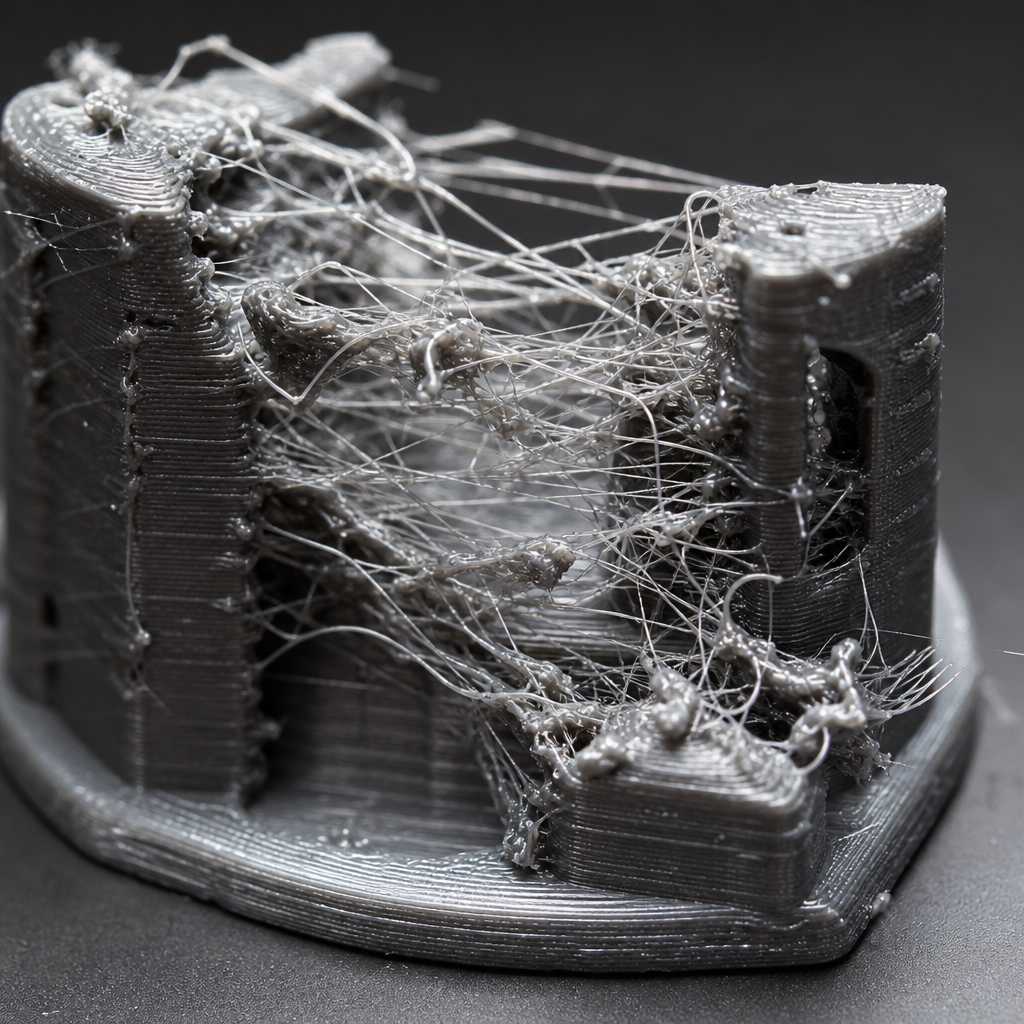
Stringing vs Layer Delamination: A Case Study in AI Accuracy
Stringing and layer delamination represent two of the most commonly searched print defects, and they serve as a useful case study because they require essentially opposite corrections. Getting this diagnosis wrong is a reliable way to turn one problem into three.
Stringing occurs when molten filament oozes from the nozzle during travel moves and deposits thin threads across open air gaps. It appears as fine cobweb-like filaments bridging between towers or across cavities. The standard fix involves increasing retraction distance or speed, lowering print temperature by 5 to 10 degrees, or increasing travel speed so the nozzle crosses gaps faster than material can ooze.
Layer delamination is physically the opposite situation. Layers fail to fuse together because the temperature is too low, the layer height is too large relative to the nozzle diameter, or the print speed is too fast for adequate heat transfer. It appears as visible cracks or separation between horizontal layers, often running in a straight line across the part. The fix is raising print temperature, reducing layer height, or slowing print speed, the exact opposite of the stringing fix on two of those three parameters.
“The hardest part of 3D print troubleshooting is that the same visual symptom, poor surface quality, can have six different root causes. Without a systematic classification model, you are essentially guessing in order.” – noted by multiple engineering educators working with FDM fabrication courses at polytechnic institutions.
Vision AI separates these two defect classes reliably because their geometric signatures are completely different. Stringing produces artifacts above the print surface in the Z-axis, extending horizontally through air. Delamination produces cracks within the print body along the XY plane. No amount of ambiguous surface texture description from a user captures this distinction as cleanly as a photograph does.

Comparison of 3D Print Failure Diagnosis Approaches
Not all troubleshooting methods deliver the same speed, accuracy, or actionability. The table below compares the three most commonly used approaches for 3D print failure diagnosis against criteria that actually matter to operators who need to fix a problem and resume printing.
|
Approach |
Accuracy and Specificity |
Time to Actionable Fix |
|---|---|---|
|
Community Forum Advice (Reddit, Facebook groups) |
Inconsistent. Highly dependent on who responds. Multiple conflicting suggestions are common. No structured classification framework is applied. |
Hours to days. Requires posting, waiting for replies, filtering contradictory advice, and running test prints to verify each suggestion. |
|
Static Troubleshooting Guides (PDF charts, manufacturer docs) |
Moderate for common defects, poor for edge cases. Guides assume ideal conditions and clean defect signatures, which rarely match real-world prints. |
30 to 60 minutes of reading, plus additional test prints. Still relies on the user correctly identifying the defect category before consulting the guide. |
|
AI Photo Diagnosis (vision-enabled tools like Ask The Nozzle) |
High, especially for overlapping defect classes. Model reads physical geometry directly rather than relying on user description. Slicer-specific recommendations reduce interpretation error. |
Under 2 minutes from photo upload to specific setting recommendation in PrusaSlicer or OrcaSlicer. No additional test prints required to identify the problem. |
What Good AI Photo Diagnosis Output Actually Looks Like
A diagnosis that says “you probably have a stringing problem, try adjusting retraction” is not useful. It is slightly better than nothing. What a properly functioning AI 3D printing troubleshooting tool should return is a specific defect classification, a ranked list of probable root causes, and exact parameter adjustments mapped to named settings in the slicer you are actually using.
For example, a well-structured output for a stringing diagnosis on a PETG print in OrcaSlicer should read something like: “Defect detected: Stringing. Primary cause: Insufficient retraction at travel speed. Recommended adjustments: Increase retraction distance from current value to 0.8mm (OrcaSlicer: Filament Settings, Retraction), reduce nozzle temperature by 5C to 235C, verify travel speed is set to minimum 150mm/s.” That output requires zero additional interpretation. You open OrcaSlicer, find the named setting, make the change, and print again.
Why Slicer-Specific Output Matters
The 3D printing community uses a fragmented ecosystem of slicers. PrusaSlicer labels settings differently than OrcaSlicer, which labels things differently than Cura. A diagnosis that recommends “increase retraction” without specifying where to find that setting in your specific slicer creates a second research task. For newer operators, that research task is itself a failure point where incorrect settings get changed. Ask The Nozzle’s integration with PrusaSlicer and OrcaSlicer naming conventions eliminates that friction entirely.
Pro tip: When evaluating any AI 3D printing troubleshooting tool, test it with a known defect before trusting it with a complex failure. Upload a photo of a clearly stringy print and check whether the output names the exact slicer setting to adjust. If it does not, the tool is providing general advice rather than a real diagnosis.
How to Photograph a Failed Print for Accurate AI Analysis
The quality of a 3D print photo diagnosis output is directly constrained by the quality of the photo input. A blurry image taken under yellow incandescent light from across the room will return a low-confidence result or a misclassification. This is not a limitation unique to AI. A human expert looking at the same photo would struggle too.
The most reliable photos for diagnostic purposes share four characteristics. First, they are taken under natural daylight or bright white LED light, which preserves true surface texture without color shifts. Second, they include a close-up of the defect area from a distance of 10 to 15 centimeters, close enough that individual layer lines are visible. Third, they capture at least one angle that shows the defect in profile, not just from above. Fourth, the print is placed against a neutral background, ideally white or light gray, so the defect geometry is not obscured by visual noise.

Common Photo Mistakes That Reduce Diagnosis Accuracy
The single most common error is photographing the print while it is still on the build plate. This obscures the first layer completely and limits the viewing angle significantly. Remove the print, place it on a flat neutral surface, and photograph it from multiple angles. The extra 60 seconds this takes translates directly into higher-confidence AI output.
A second common mistake is photographing only the most dramatic part of the failure. If a print has stringing concentrated near the top and layer shifting near the bottom, capturing only the top half means the AI receives incomplete evidence. The spatial distribution of a defect across the full print height carries diagnostic information that a cropped photo cannot provide.
Frequently Asked Questions
Can AI photo diagnosis work on any type of 3D printer or only FDM?
Vision AI for print failure diagnosis is currently most mature and most accurate for FDM prints, where defect signatures like stringing, layer delamination, and surface artifacts are visually distinct. Resin (MSLA and DLP) failures often require different visual cues related to curing, delamination from the FEP film, and support failure, which is a distinct problem domain. Ask The Nozzle’s diagnostic tooling is optimized for FDM materials and processes and works across the common material types including PLA, PETG, ABS, ASA, and TPU.
How accurate is vision AI compared to an experienced human operator?
In practice, a well-trained vision AI model performs comparably to an experienced operator for the most common defect classes, including stringing, warping, layer delamination, and underextrusion, and often outperforms human assessment for overlapping defect signatures where multiple issues are present simultaneously. Human experts carry recency bias and tool-specific familiarity that can skew their diagnosis. AI models apply the same classification criteria consistently across every image.
Do I need to provide my slicer settings along with the photo for the diagnosis to work?
Providing your current slicer settings alongside the photo significantly improves diagnosis specificity. The photo tells the AI what the defect looks like. The settings tell it what parameters are already in play, which helps rule out some root causes and prioritize others. If you do not have your settings available, a photo-only diagnosis still returns a useful result, but the recommended adjustments will be expressed as directional changes rather than specific target values.
What if my print has multiple defects at the same time?
Multi-defect prints are common and are where manual diagnosis fails most severely. Vision AI handles them by classifying each detected defect independently and then ordering the recommendations by likely impact. A print showing both stringing and Z-seam artifacts, for example, will return two separate diagnoses with separate parameter recommendations, ranked so you address the more structurally significant issue first. Ask The Nozzle’s knowledge base includes documented multi-defect case studies specifically to improve accuracy in these complex scenarios.
Is AI photo diagnosis useful if I already know what the defect is?
Yes, because identification and root cause analysis are two different tasks. You might correctly identify that your print has stringing without knowing whether it is caused by temperature, retraction, travel speed, or material moisture content. The AI diagnosis step is most valuable precisely at that second stage, moving from defect label to specific parameter fix. The tool does not stop at naming the problem. It traces it back to the most probable slicer or hardware cause and gives you an actionable correction path.
How does Ask The Nozzle’s photo diagnosis differ from a generic AI chatbot?
A general-purpose AI chatbot responding to a description of your print problem is working from your text, which already contains your interpretation errors and omissions. Ask The Nozzle’s vision-enabled diagnostic tool reads the image directly, applies a classification model trained on real-world 3D printing failure cases, and maps its output to specific settings in PrusaSlicer and OrcaSlicer. It also integrates with the platform’s pre-flight gcode checker and conversational expert tool, so a photo diagnosis can feed directly into a broader settings review rather than existing as an isolated recommendation.
Have you tried AI photo diagnosis on a failed print yet? Share what defect it caught, or where it surprised you, in the comments.
Leave a Reply